Step-by-Step Guide to Installing a Home Inverter System

Introduction
In today's fast-paced world, where uninterrupted power supply is crucial, a home inverter system plays a pivotal role in ensuring that your household remains powered during unexpected outages. A home inverter system acts as a lifeline during unexpected blackouts, ensuring that essential appliances and devices stay powered, providing comfort and convenience. Whether it's powering lights, refrigeration, or crucial electronic devices, an inverter system plays a pivotal role in safeguarding against disruptions and potential damage caused by abrupt power interruptions.
Key takeaway
Installing a home inverter system can significantly enhance energy independence and provide reliable power during outages. By following a structured approach, including proper sizing, careful wiring, and adherence to safety guidelines, homeowners can successfully install and enjoy the benefits of a reliable and efficient off-grid or grid-tied power solution.
Read more...Step-by-Step Guide to Connecting an Inverter to a Distribution Board

Pure Sine wave Inverter 1.6Kva/24V Lento
Choosing an appropriate location for your inverter is a critical step in the installation process. Optimal placement ensures efficient operation and longevity of the system. Ideally, select a well-ventilated area with sufficient space around the inverter for proper airflow, as it helps dissipate heat generated during operation. Avoid placing the inverter in direct sunlight or near heat-emitting appliances to prevent overheating. Additionally, consider proximity to the main electrical panel to minimize wiring distances, reducing potential energy losses. A dry and cool environment is preferable to protect the inverter from moisture, which could lead to corrosion or electrical issues. By carefully selecting the location for your inverter, you contribute to the system's overall performance and reliability, ensuring that it functions seamlessly to provide uninterrupted power when needed. Continue reading to learn more
Whether you're a DIY enthusiast or a homeowner looking to understand the installation process, this guide is designed to walk you through each step, making the installation of a home inverter system a manageable and rewarding task. So, let's embark on this journey together as we delve into the essential details and provide you with the knowledge to set up a reliable inverter system for your home.
Pre-Installation Preparation for Inverter Systems
Assessing Power Requirements
To ensure your inverter system meets your energy needs, you must first assess your power requirements. This involves calculating the total power consumption of all the appliances you plan to run on the inverter. Start by listing each appliance along with its wattage, then sum up the wattages to get the total power needed. Remember to consider both the continuous rating (power used during normal operation) and the surge power (power used during startup, which is typically higher). For example, if your home requires 410W, considering a power factor of 0.8, you would need an inverter with a rating of at least 0.6KVA. However, it’s advisable to choose an inverter with a higher capacity to accommodate additional appliances and surge power, so in this scenario, an inverter rated at 1KVA would be ideal.
Selecting the Right Inverter
Choosing the right inverter is crucial for the efficiency and longevity of your power system. Inverters come in various types and capacities, so select one that matches your assessed power requirements. Consider factors like wattage rating, start-up surge watts, and voltage rating. Ensure the inverter’s continuous power output is slightly higher than your total power needs to handle any unexpected surges or additional loads. Additionally, look for inverters with good efficiency ratings and features that suit your specific needs, such as battery backup time, display features, and safety protections.
Gathering Necessary Tools and Equipment
Before beginning the installation, gather all the necessary tools and equipment. You’ll need a mounting system for the inverter, power cables, circuit breakers, safety gear (like gloves and eye protection), and hand tools (such as screwdrivers, pliers, and a multimeter). It’s also important to have a clamp meter to verify current and voltage, an insulation tester, and possibly a solar irradiance meter if you’re incorporating solar panels into your system. Ensure you have all the required items as well as the instruction manual before starting the installation to avoid any interruptions.
Safety Precautions
Understanding Electrical Safety
Electrical safety is critical when working with inverter systems. It’s important to understand the risks involved, such as electric shock, short circuits, and fire hazards. Always adhere to the manufacturer’s safety instructions and local electrical codes. Be cautious around batteries, as they can contain corrosive substances and emit flammable gases. Remember that the human body is a conductor; touching a voltage source can result in electric shock, which can cause severe injury or death.
Necessary Safety Gear
Proper safety gear is essential to protect yourself during the installation process. This includes insulated gloves, safety goggles, flame-resistant clothing, and sturdy footwear. Additionally, having a fire extinguisher nearby is advisable in case of an electrical fire. Depending on the installation environment, you may also need safety helmets, safety belts, and jackets.
Power Shutdown Procedures
Before starting any work, ensure all power sources are safely shut down. This includes turning off DC breakers connected to the PV array and disconnecting any AC power sources such as shore power or generators. Follow a systematic shutdown procedure to ensure all components are de-energized before beginning the installation. This may involve opening the AC combiner box and turning off the inverter’s AC breaker.

Kan 12v. 220AH Solar Tubular Battery
Installation Process for a Home Inverter System
Locating an Ideal Installation Site
The ideal location for your inverter is crucial for its performance and longevity. It should be a cool, shaded place with good air circulation and minimal exposure to moisture. Avoid direct sunlight to prevent overheating. The site should be near the battery bank and close to the main electrical panel to minimize cable length and voltage drop. Ensure there’s enough space around the inverter for heat dissipation and maintenance access.
Mounting the Inverter
When mounting the inverter, ensure it is installed in a stable, vertical position to facilitate proper cooling and operation. The mounting surface should be solid and vibration-free. Follow the manufacturer’s guidelines for the correct orientation and clearance around the inverter to avoid overheating and allow for easy access during maintenance.
Connecting Batteries
To connect batteries to the inverter, you can use a parallel configuration to keep the voltage the same while increasing capacity. Ensure that the cables used are of the appropriate size to handle the current and that the connections are secure and correctly polarized. Always check the inverter’s specifications for the recommended battery setup and follow safety guidelines when handling batteries.
Wiring the Inverter to the Main Electrical Panel
Wiring the inverter to the main electrical panel requires careful attention to safety and local electrical codes. Turn off the main power and use the correct size of wire based on the anticipated amperage and voltage. Connect the inverter’s output wires to a dedicated breaker in the panel, ensuring proper insulation and secure connections.
Grounding the System
Grounding your inverter system is essential for safety and to prevent damage. All components should be grounded to the same point to avoid potential differences. Use a copper grounding rod and connect it to the inverter’s grounding terminal using a thick copper wire. Ensure that the grounding meets the National Electric Code requirements.
Configuring And Testing
Setting Inverter Parameters
Configuring the inverter parameters is essential for optimal performance. Start by connecting to the inverter using the manufacturer’s software or interface. Set the grid code based on your location and application scenario. Adjust the isolation settings and output mode to match your system’s grounding status and connection to the power grid. Enable the automatic start upon grid recovery feature if desired, and set the grid reconnection voltage and frequency limits to comply with local standards. Remember to save your settings after configuration.
Testing the System
Testing the inverter system ensures everything is functioning correctly before going live. Perform an insulation resistance test to check the integrity of the system’s insulation. Measure the voltage and current to verify that they are within the specified range. Test the power conversion efficiency to ensure the inverter is converting energy efficiently. Use a multimeter or clamp meter to perform these tests, and consult the manufacturer’s manual for specific testing procedures.
Troubleshooting Common Issues
When troubleshooting common inverter issues, start by checking for weak or discharged batteries. Ensure the voltage regulation is set correctly and that the inverter is not overloaded. If the inverter trips, press the reset button or repair the power switch if it’s causing issues. For a faulty or defective battery, consider getting it replaced. If you encounter more complex issues, refer to the manufacturer’s troubleshooting guide or consult a professional.
 390watt Tescom")
Solar Panel (Mono PERC) 390watt Tescom
Integration with Solar Panels (if applicable)
Connecting Solar Panels to the Inverter
To connect solar panels to an inverter, follow these steps:
- Determine Your Power Needs: Calculate the total power consumption of your appliances to determine the number and size of solar panels and the inverter you’ll need.
- Choose the Right Inverter: Select an inverter compatible with the voltage of your solar panels and the power output required. Consider a pure sine wave or modified sine wave inverter.
- Wiring Your Solar Panels: Decide whether to wire your solar panels in series or parallel based on your system’s voltage and current requirements.
- Connect Your Solar Panels to the Inverter: Ensure the maximum DC input voltage of the inverter matches the output of the solar panels. Use proper connectors and follow the manufacturer’s instructions.
- Connect the Inverter to the Battery or Grid: If you have an off-grid system, connect the inverter to the battery. For grid-tied systems, connect the inverter to the grid.
- Install a Charge Controller (If Needed): A charge controller regulates the voltage and current from the solar panels to the batteries, preventing overcharging.
Configuring Solar Charging Settings
Configuring the solar charging settings is crucial for battery longevity and system efficiency. Here’s how to set it up:
- Select the Right Charge Controller: Choose between PWM and MPPT controllers based on your system’s needs.
- Set the Voltage and Current Parameters: Adjust the voltage setting of the charge controller to match the charging requirements of your batteries.
- Profile Setting: Set the optimum power output parameters, voltage, and current of your solar array according to the type of solar battery you’re using.
Maximizing Solar Power Utilization
To maximize solar power utilization, consider the following:
- Load Matching: Match the power consumption level with the supply level to improve the efficiency of power utilization.
- Energy Storage: Use energy storage systems like batteries to store excess solar power generated during the daytime for use during low-production periods.
- Optimize Panel Orientation: Orient panels in different directions to minimize the shortfall between load and generation, which benefits both the end-user and the stability of the grid.
Read more...How to Improve Energy Efficiency with the Right Inverter Battery
Maintenance Tips for Inverter System
Regular Inspection and Cleaning
Regular inspection and cleaning are vital to maintaining the efficiency and longevity of your inverter system. Here’s what you should include in your maintenance routine:
- Inspect battery terminals for corrosion and loose connections to prevent arcs and overheating.
- Check the inverter’s environment for extreme temperatures, ensuring it’s in a cool, dry location with plenty of ventilation.
- Look for signs of wear and tear on connections, which could lead to electrical issues.
- Monitor the control panel for warning messages or error codes that could indicate problems.
- Schedule regular maintenance according to the manufacturer’s recommendations, typically once every two years.
- Clean the air intake filter on your solar panels every six months to prevent dirt and dust from clogging up important parts like fans and cooling systems.
Battery Maintenance
Proper battery maintenance is crucial for the performance of your inverter system. Here are some tips:
- Program voltage set points so that the battery bank charges at the proper voltage.
- Refill flooded lead-acid batteries with distilled water every - weeks as needed.
- Regularly check the battery state of charge and apply an equalization charge to flooded batteries every 90 days.
- Ensure proper ventilation to reduce heat up and increase the life of a battery.
- Use your battery regularly: If there are no power cuts, discharge the battery once every month and recharge again.
Software and Firmware Updates
Keeping your inverter’s software and firmware up-to-date is essential for optimal performance and security. Here’s how to manage updates:
- Download the latest firmware updates from the manufacturer’s website.
- Log onto the inverter using the manufacturer’s software or interface.
- Navigate to Device Configuration and select 'Update the firmware’.
- Locate the appropriate firmware update on your smart device and click 'Update firmware’.

77 PCS Tools Set INGCO HKTHP20771
Essential Products and Tools for Installing a Home Inverter System
Read more...How to Maintain Your Inverter Battery for Longevity
Choosing the Right Inverter for Your Home
Selecting the correct inverter is crucial for a reliable and efficient system. Here's what to consider:
Power Rating (Watts/kVA):
This determines how much power the inverter can supply. Calculate your total wattage needs (see the Appliance Wattage Table below) and choose an inverter with a continuous power output slightly higher than this. Consider surge power requirements for appliances like refrigerators and motors. (Include Appliance Wattage Table here)
Inverter Type:
- Pure Sine Wave: Produces the cleanest power, suitable for all appliances, especially sensitive electronics.
- Modified Sine Wave: Less expensive but may not be compatible with all appliances.
(Include images of different inverter types)
Voltage:
Ensure the inverter's input voltage matches your battery bank voltage (e.g., 12V, 24V, 48V).
Efficiency:
Look for inverters with high efficiency ratings (e.g., 90% or higher) to minimize energy loss.
Features:
Consider features like overload protection, short-circuit protection, low-voltage shutdown, and built-in chargers.

Cleon Solar and Inverter Tall Tubular battery 12V 240AH
Troubleshooting Guide
Identifying and Addressing Common Issues
When troubleshooting an inverter system, it’s important to identify whether you’re dealing with a minor or major fault. Minor faults might include alarms for transformer overheating or cabinet door opening, which do not require system shutdown and can be resolved without storing records. Major faults, such as over-current or main control board failure, will display a fault indication and may require a high voltage disconnect. Here are some common issues and their solutions:
- Over-temperature alarm: If the transformer’s temperature exceeds its set alarm temperature, it triggers an over-temperature alarm.
- Short backup time: This could be due to excessive power consumption, incorrect charging, or low electrolyte levels in the battery. Solutions include reducing loads, charging the battery correctly, and refilling water in the battery.
- Inverter not turning on: Check power connections, inspect for damages in the solar panel array, reset the inverter, or contact professional service.
- Faulty Battery Charging: Inspect the battery connections and check for loose or corroded terminals. Monitor the charge controller or charge regulator for proper functionality. Verify the battery condition and charging voltage against manufacturer specifications.
- Inverter Error Codes or Alarms: Refer to the inverter manual to interpret error codes or alarms. Address the specific issue indicated in the manual. Common error codes may relate to overvoltage, under voltage, or internal faults.
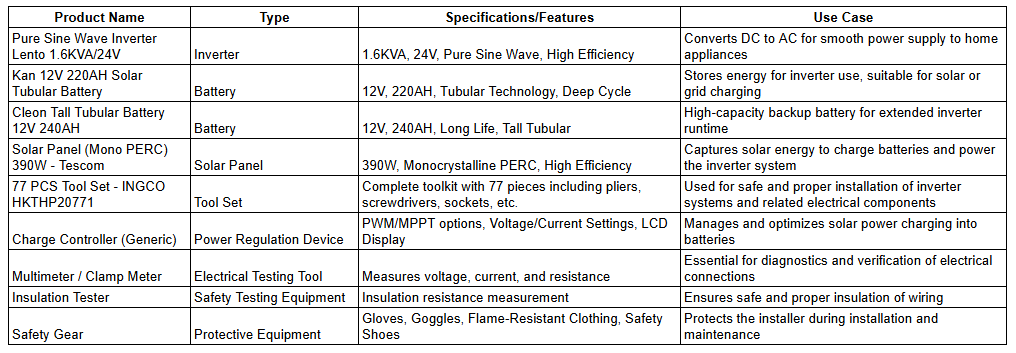
Inverter Size Selection Table
This table provides general guidelines. It's crucial to consider surge loads and future power needs when choosing an inverter. Consulting a professional is recommended for accurate sizing.
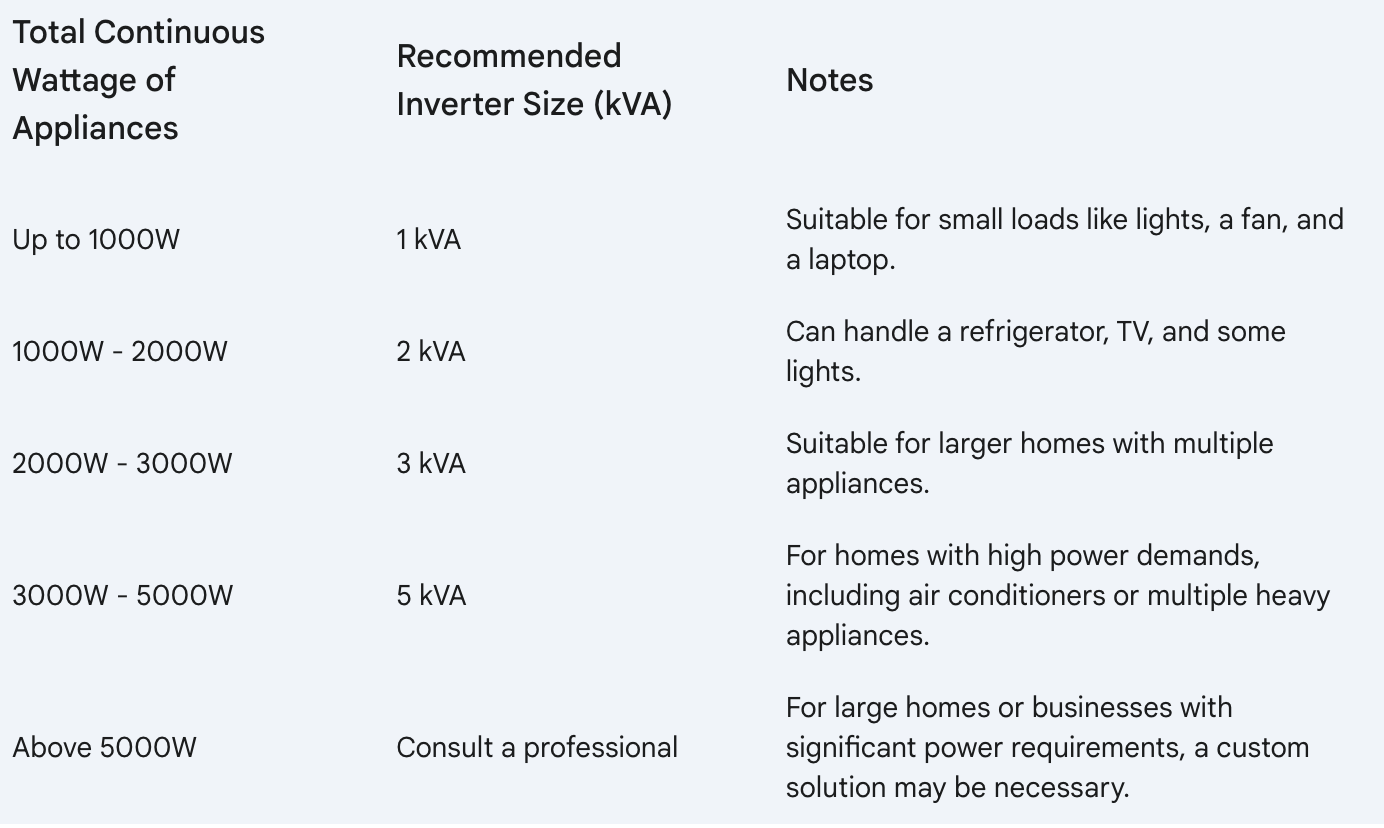
Battery Capacity Calculation Table (for 12V Systems)
This table shows the minimum battery capacity required for a specific load and desired backup time. Actual battery life can vary depending on factors like battery age, condition, and discharge rate.
Formula Used: Amp-hours (Ah) = (Wattage × Backup Time) / Battery Voltage
Important Notes for the Battery Table:
- These calculations are for 12V systems. For 24V or 48V systems, the required Ah will be lower.
- It's generally recommended to discharge batteries to no more than 50% of their capacity to prolong their lifespan. This means you should choose a battery bank with double the calculated Ah.
- This table assumes a relatively constant load. If you have appliances with high surge currents (like refrigerators), you'll need to factor that into your calculations.
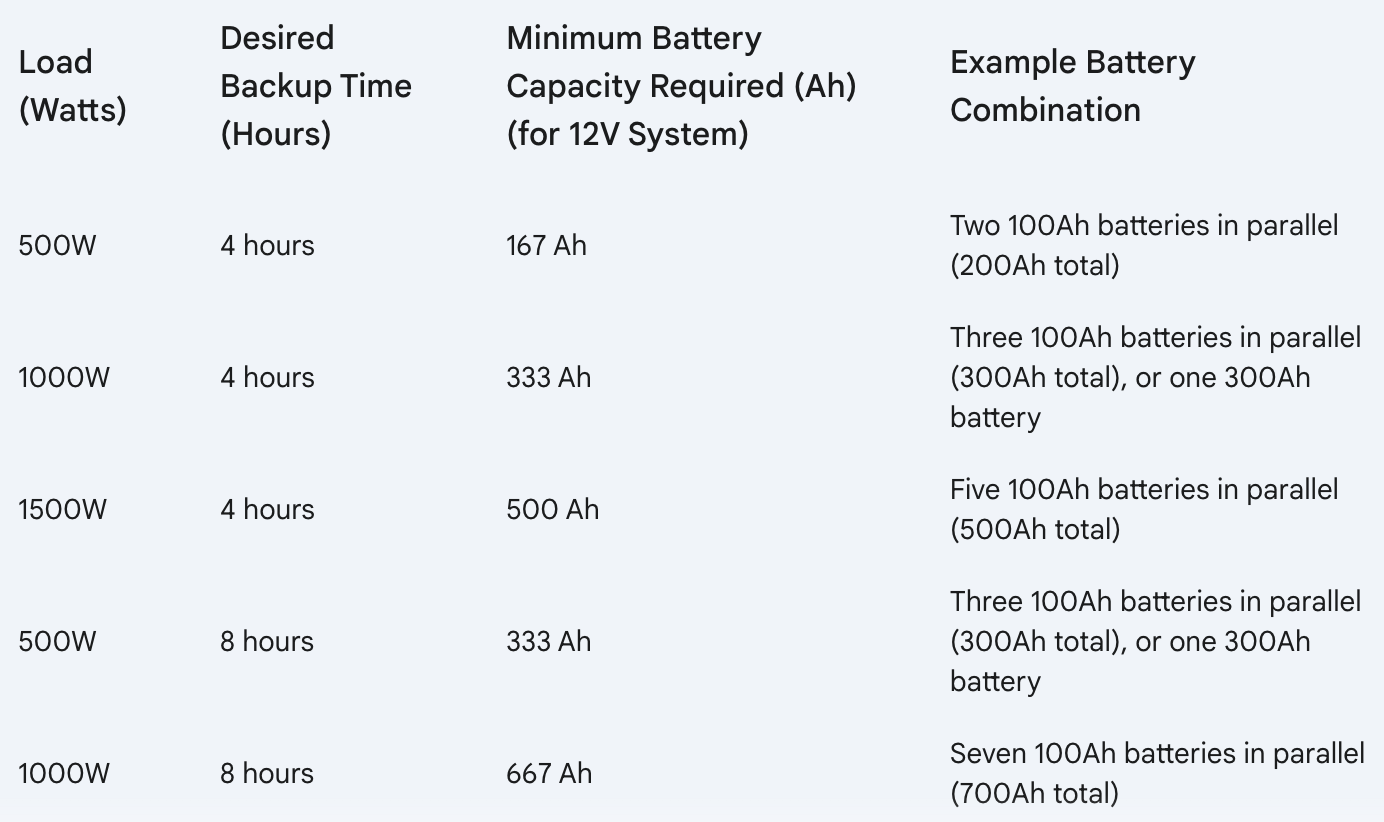
Wiring Gauge Chart (American Wire Gauge - AWG)
This table provides a general guideline. Always consult local electrical codes and the equipment manufacturer's specifications for accurate wiring information.
Consulting Manufacturer Guidelines
For specific troubleshooting steps, it’s essential to consult the manufacturer’s guidelines. They provide detailed instructions on how to address various issues and may recommend tools and equipment for the job. Manufacturer guidelines will also include safety precautions and best practices for operation and maintenance, ensuring that you handle your inverter system correctly and safely.
Related Article;
The Best Inverter Battery in Nigeria 2023 Reviews
How power Inverters in Nigeria Work
How to Compare Inverter Battery Brands for Industrial Equipment
Conclusion
Installing a home inverter system is a smart and practical step toward ensuring uninterrupted power supply and energy efficiency in your home. By following this step-by-step guide, you can confidently set up your inverter system, protect your appliances, and reduce dependency on the main grid. Whether you're preparing for frequent outages or simply looking to enhance your home's energy resilience, having the right inverter system in place makes all the difference.
Ready to power up your home the smart way? Explore our range of high-quality inverters, batteries, and accessories at Tikweld Welding supplies and take the first step toward reliable, efficient energy today! If you need expert assistance or product recommendations, our team is just a click away—reach out now!
Newest Guide & Blog Updates
Press Release: Lubemax Reinforces Support for Heavy Equipment Operators
Introduction Epoxy Oilserv Nigeria Limited, the official manufacturer of the high-performance Lubema...
")
Cordless Drill Driver Buying Guide: Features, Prices & DongCheng Review (Nigeria 2026)
Introduction Whether you are a professional contractor working on a high-rise in Lagos, a technician...

Top 5 Tubular Batteries for Reliable Power Backup in Nigeria 2026
Introduction Nigeria's frequent power outages and unreliable electricity supply make having a depend...
")
Top 5 Best Tubular Batteries in Nigeria (2026 Updated Review & Price Guide)
Top 5 Best Tubular Batteries in Nigeria (2026 Updated Review & Price Guide) Introduction Nigeria's p...

Why Choose Shell 20W50 Engine Oil: Benefits, Applications, and Performance
Key Takeaway High-Temperature Stability: Shell 20W50 provides excellent stability at high temperatu...
")
Industrial Cleaning Safety Standards for Nigerian Facilities (2026 Guide)
Introduction Industrial cleaning plays a critical role in maintaining safe, productive, and complian...